Sunday, 22 April 2012

The Belle, The Governess, And The Asylum Patient

After spending what felt like way too long decorating our living room (Pics below) I had a huge burst of doll making.

Once I finished Scarlett I had a real need to make not just one, but two more dolls. Where Scarlett had been big, these two are tiny little ladies. And all of them have their own stories to tell.

The first of them is Violet.

Violet’s rags were once a pretty flower patterned gown. Now they hang in tatters and she’s ashamed of the way her hem has torn loose and her skirts are no longer long enough to cover her dirty legs. She has no way of replacing her garments or cleaning them, and is laughed at when she asks. She’s sometimes forced into the flea redden “decent” gown that at some point all the ladies get to wear, but only on the rare occasions the kind sad man comes or her family send an overseer to check on her progress. She knows this sweaty oily leering man always takes away the false report the attendants give of her, but what can she do.

She’s not really sure anymore if this is how it always was. She has vague memories and dreams of living in a pretty cottage with flowers around the door. The kind sad man is there, but now she can’t even remember who he is. She’s so confused. Once she thinks she may have known who she was, but the attendants beat her whenever she tries to insist on something as fact, and she’ll do anything to avoid the torture of water treatments again. All she’s now sure of is that 1her name is Violet. She’s trapped in the asylum and has no idea what is expected of her or of if she’ll ever be able to leave. They keep her in a strait jacket with one arm bound as they say she’s a trouble maker, and she can’t even pick up one of the few tatty dirty books that lay on the floor of the gallery. She’s happy in her dreams, at a warm fireside in the pretty cottage, quietly sewing or reading while the kind man studies his paper. Is he her farther? Her Husband?
She would ask him next time he comes, but she knows it’ll only make him sadder.

Next came Sophie. For such a quiet young lady she really shouted out loud. Sophie is a Victorian governess working for a well to do family in a country house near Bath. She was born in a comfortable home where she lived with her brothers and her father, the local priest. She looked after the house for the two men, and quietly taught herself the finer things allowed to her, such as music and poetry. She was a great learned and read many of her father’s generous collection of books. Sophie was quiet and thoughtful, kept away from the greater world by her circumstances and shy nature.
Like many unfortunate Victorian women Sophie found herself alone and without any way of supporting herself when her father passed away. Her brother had his own family to support, and a gambling problem that meant that any money he could have provided to support Sophie was frittered away at the gaming tables. There was only one option open to her (apart from the unthinkable), and that was to become a governess.
She joined a family that looked on her as beneath them. She was of the same background and class as they were, but was treated worse than the lowest servant; forced to clean up the children’s food when they purposely ground it into the rug as the housemaids refused it. She was unsupported in her discipline, and her every achievement ignored. But she was powerless to improve her situation and had to endure the ghost like life she was expected to lead.

Sophie has a quiet subdued gown made of a silky blue patterned fabric, worn with a white gathered high necked blouse, a cream sash and neck ribbon. The gown has a corset style bodice and long narrow sleeves with a wide bell shaped skirt. Underneath she has a red ruffled petticoat that’s actually stiff enough to let her stand unaided, with a plain white cotton petticoat, split crotch drawers, gathered shift and corset below.
My Scarlett was of course inspired by Scarlett O’Hara, as played by the wonderful Vivian Leigh in Gone With The Wind, is one of my favourite fictional people. I love to watch the story and her character unfold from the young spoilt beautiful girl into the determined passionate woman she became. She’s not altogether a nice person; in many ways she’s very spiteful and even cruel, her own stubborn selfish attitude leading to the loss of the one man that truly loved her. But underneath it all she has a lot of love and kindness as she battles through every difficult circumstance while looking after her extended family. She shows courage and resilience, determination and great spirit, as well as pettiness and jealousy. She shows the best and worst parts of human nature.

I decided to make my Scarlett after watching this wonderful epic film again for the first time in a few years. At the same time I found out that one of the lovely doll makers I talk to online is the lucky owner of one of those fabulous Deep South accents. I couldn’t get thoughts of huge crinoline dresses and fluttering fans out of my mind, so made Scarlett in honor of all those stunning past and present Southern Belles.

As I said at the top of this post, I thought I'd show you all the hard work hubby and me have put into getting our Living Room pristine and perfect over the past few weeks. We've seen more dust than I ever though possible, have put up with bare walls and very little furniture, and have worked every minute we could find, and finally we've finished everything. Even the tiny fiddly crappy jobs that always seem to get left.


Before we started we had horrible 70's artex all over the walls. Three of them were just roughly patterned, and ,most hated of all, one whole wall was covered in terrible fans. We also had a big hole in the ceiling from when all of our doors slammed and the house vibrated like a herd of elephants had run into it, cracking the old black plaster and raining a torrent of nasty lumps and dust over everything. The floor was scratched, the cushions old, and the paint work all faded.


We had the ceiling fixed up and over-boarded. There was no way I'd let them take down the old black plaster and lath after seeing how much mess one patch had made, so now we have extra sound proofing for upstairs (score!). Cris and I got to work re-staining and varnishing the floor, window sill, doors and skirting. We had the walls plastered to hide that horrible texture. I'll never understand how that stuff became the fashion in the first place. And we've painted all the walls with a sealing coat and two coats of colour.


It's taken us an age to get everything back to how we wanted it. Of course we had to go through all of our books and move another arm full upstairs. We really do have too many (four big bookshelves full) but I can never make myself get rid of any, and read them over and over again. And in the middle of everything else I decided it would be a good idea to make all new cushions to match our new colour scheme. Finally everything is done; all the pictures are rehung, and the tiny touch-ups done, and everything shiny and bright. I hated it when we were doing it, but I really love how it's turned out. It's not everyones taste, but we love it :)

Next, another doll of course. Not sure who she'll be yet, but I'll let you know.


Saturday, 14 April 2012

How To... Make A Ruffled Petticoat

 And it still goes on... The decorating I mean.
We still have the odd little bits and pieces to finish, but we're now almost there. But unfortunately it's meant that not a lot of doll making has happened, and this poor lady is still in her undies.

I wanted to share something with you all, but all I've managed to do is finish her ruffled petticoat. So as it's one of my most hated hand sewing tasks (even though I love the results) I thought I'd share with you my technique.
Of course as I'm a doll maker, this is a doll sized petticoat. But the method would be very much the same to make a full sized one - It would just take a lot longer and involve a load more fabric.

Step 1 - First you need to find the measurement of your base for the ruffled petticoat. The easiest way I've found to do this is to make sure all the under-petticoats, crinoline and calico petticoat are laying as they should be, fluff them up a bit, and then gently lower the doll down onto a flat surface - trying to make sure that the diameter of the skirts stays basically the same. Once this is done I use either a dressmakers tape measure or a piece of ribbon to measure around the circumference. Each petticoat added to this style of clothing should be at least a few Cm's bigger than the last, so once you find your base measurement add on a couple of centimetres just for good measure. I normally add 4-5cm's.

 
Step 2 - Your ruffles need to be double the width of the base. I know the base is already looking too big to ever fit around your doll (or you), but trust me this does work.
You can add as many ruffles as you like, and bring them up as high as you like. But I'd suggest leaving at least the waist to mid thigh area free of ruffles as the waist gathers add a lot of bulk on their own. Decide how many ruffles you want to add, and cut enough strips (piece together to gain the right width) that are double the width of the base.

Step 3 - Now the horrible bit, for me anyway. The base, and each ruffle have to be hemmed. To add to the stiffness that you want a double rolled hem is best. You don't need to make things more complicated with fancy stitches unless you want to. I normally use cotton or cotton lawn fabric to make this kind of petticoat so a straight forward running stitch works just fine. Once all your ruffles are hemmed the width needs to be measured and turned over at the other edge to give you a gathering edge. It's best not to do it in one piece unless your brave. But I get terrible trouble with tangled threads when they're long as my needle always seems to turn somehow as I go along, so I tend to gather a quarter of the width at once. Knot on at the start of your quarter, and leave a longish tail of thread free at the end. Knot on close to this and do the next quarter.

 Step 4 - Prepare the base of the petticoat by measuring out lines on your fabric with tailors chalk or a disappearing fabric marker. The first bottom ruffle mark needs to be 2mm shorter than the ruffles. My ruffles are 5cm each, so my first line is measured up 4.8cm. Because the gathers stick out once your finished they need this tiny bit of extra length so that they look the same length as your base. Each following line should be 1cm shorter than the width of each ruffle so that they overlap (my lines are 4cm apart). Or if you want loads of extra bulk then sew them closer together. Draw on all the lines now while you have a nice flat piece of fabric. Otherwise you might find that the ruffles you have sewn get in the way when trying to draw on the next line.

 
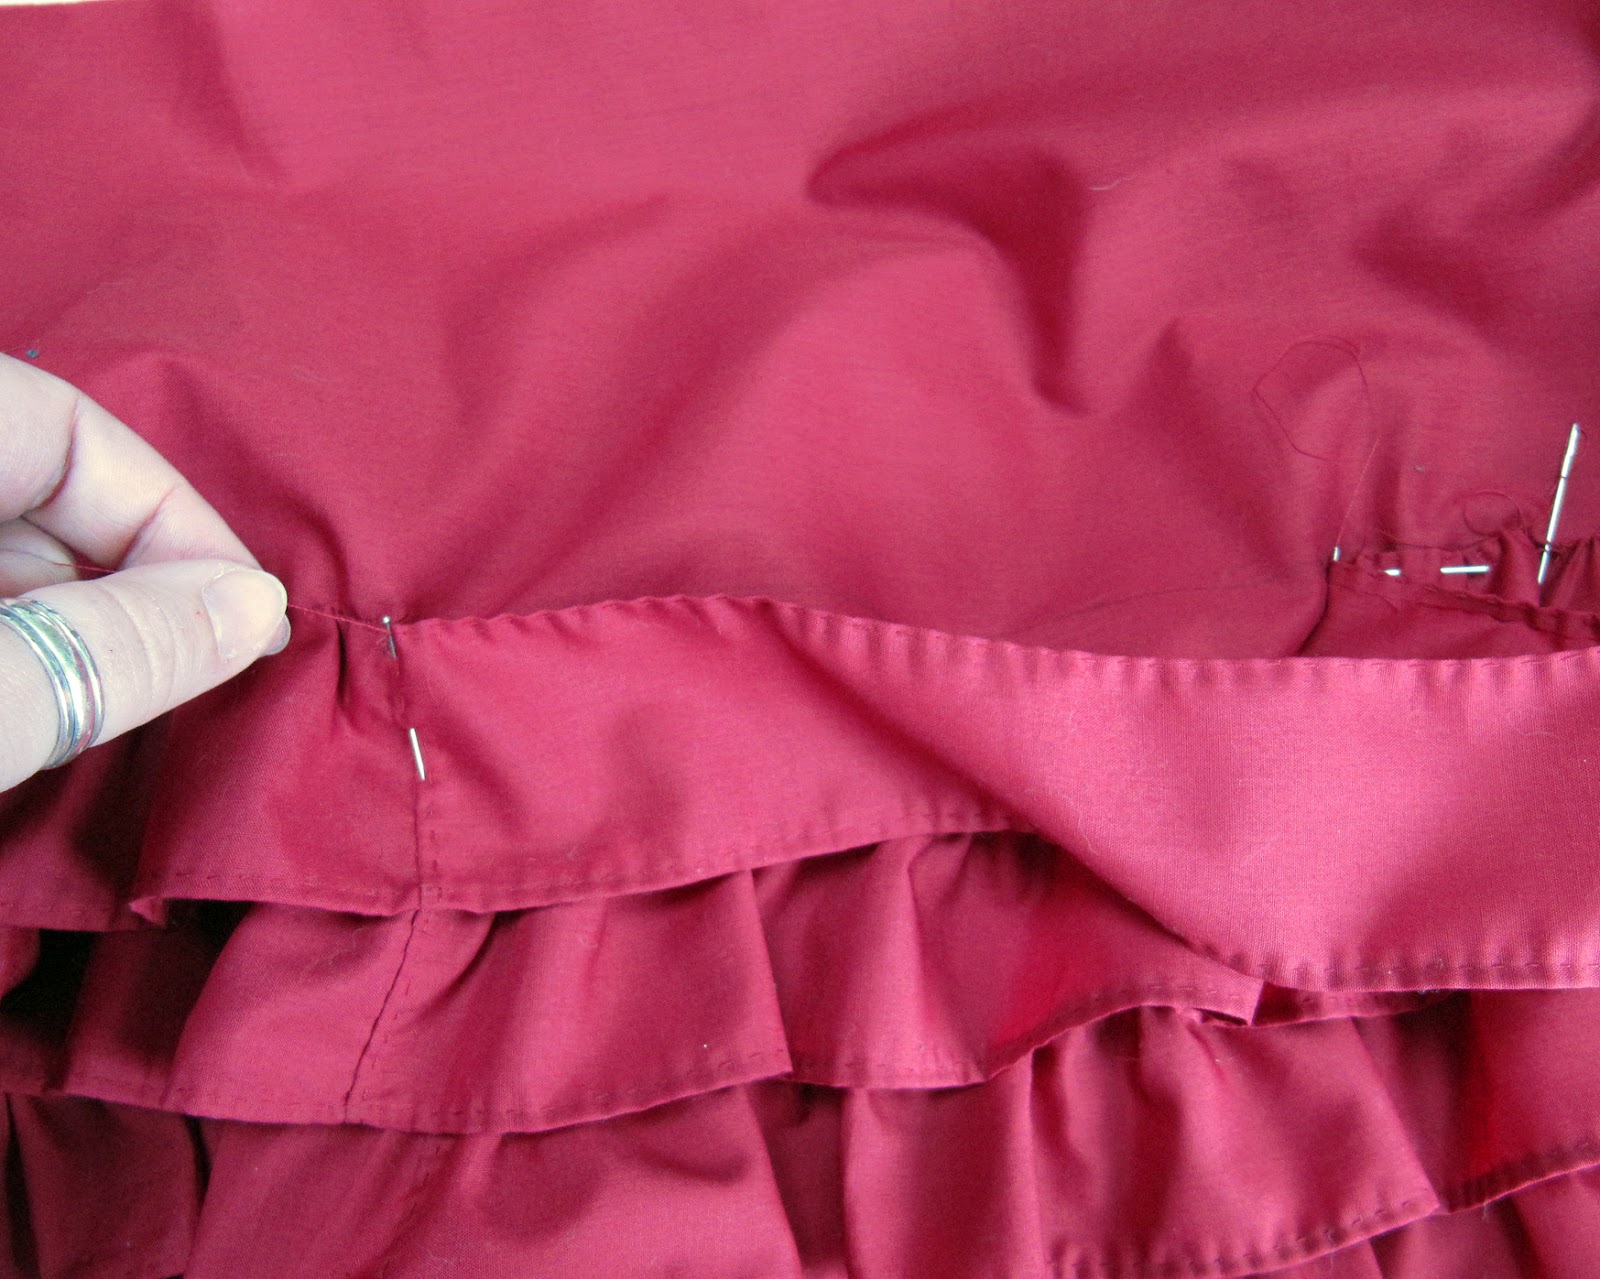
Step 5 - On both the ruffles and the base mark the fabric into 8 equal parts by adding a pin. Divide into quarters, and then divide each quarter into half rather than try and do it all at once. That way you can do it by folding the fabric and won't have to bother getting the tape measure out. If your a sewing neat freak like me you can line up all your hems, but there isn't really much need to unless you want to. Pin the ruffles to the base along your first line by matching up the 8th's that you've pinned and pining them together, Now your ruffle will hang in a load of long loops like this around your base.

Step 6 - If you try and pull up all the slack in your ruffle by taking hold of the loose end of thread and pulling everything can quickly go very wrong - I know this from experience. To get a good result here a clean doormat, a large firm cushion, or even the living room carpet can be a great tool. Starting at a knot in the gather thread of your ruffle, lay the fabric over your mat, rug, carpet or cushion and pin through the ruffle and base into it making sure that your pin is leaning back away from the direction you'll be pulling the thread in. This is a task I normally do on the floor on my living room rug as it gives me the most amount of space, but they all work just fine and I've tried them all at different times.

Step 7 -

Gathered Ruffle pinned into place.

Step 8 - When you do get to the loose end of the thread, and have used this to gather the previous section, use the remaining thread to knot the ruffle fabric to the base and stop your gathered section from coming undone by a couple of over-stitches. Don't cut of the tail of thread as this will be used. Just leave it were it is and carry on gathering sections until you get back to your starting point.

Step 9 - When you get back to where you started with gathering the ruffle, and have knotted off the loose thread, you can start sewing the ruffles to the base. Use the loose thread ends where you've over-stitched the ruffle to the base and use as small a quilting stitch (or over-stitch) as you can to sew the two together. The ruffle will have gathered into folds and bumps, so just flatten into a crease with your fingers and sew through to get the edge to lie flat against the line where your joining them.

Step 10 - There isn't much else to it really. Once you finish one ruffle you move onto the next and repeat the gathering and attaching until you have your finished ruffled petticoat. All that's left is to try it against your doll (or yourself) to find the length and cartridge pleat it to a waistband. Just make sure you allow enough length to account for the waist gathers. I sew my petticoats directly to the doll at a waistband I add before I start. If this is a full sized petticoat that you want to take off (of course) then you can measure, fold and sew a waistband with a closure. When you cartridge pleat the fabric of the petticoat to it just make sure you leave an opening along the seam where the closure is added to make sure you can get it off and on. To attach it to a doll I only sew on the top pleats of the cartridge pleat using a doubled thread, but if your making it full sized then I'd recommend sewing the bottom of the pleats as well.


And here she is in all her ruffles.

As you can see now the pleating at the waist adds a lot of bulk of it's own, so you really don't have to take the ruffles all the way up, unless you want to, if your using a crinoline. For earlier periods then the more bulk the better as there were no crinolines. Before the invention of the cage crinoline women wore corded petticoats, ruffles and any other techniques they knew, along with lots and lots of layers to get the skirt shape they wanted. The sheer weight of fabric must have been incredible. They must have had thighs like a rugby player!

Even after crinolines came on the scene there were still many many layers of skirts. Because of the restrictions I have getting all this fabric to fit around the tiny waists I like to give my dolls I usually stick to the under-petticoat, crinoline or corded petticoat, one or two ruffled petticoats, an over-petticoat and then the gown itself. You can cartridge pleat two or even three layers of petticoats to a waistband together, but you do loose out on the full width that way as each layer has to be the same width, and it creates more of a bell shape. But if that's what your after then you'll save yourself some work.

This doll has her white cotton under-petticoat, a pink satin covered crinoline, a stiff calico petticoat with a deep ruffle at the hem, and now her red ruffled petticoat. Next she'll have a fine over-petticoat trimmed with ribbon and other details before I get to started on her gown. I love the size of her skirts and the way they swing. She has a lovely weight to her already and is truly a joy to hold. I can't wait to get her finished :)


Sunday, 1 April 2012

How To... Make A Hoop Crinoline

There has been so much going on at our house I'm not really sure where I am or where to start.

The Lady of The Shrine has been finished up and sent to her new home in America. I'm really glad my customer was happy with how she turned out, and I'm really hoping she gets there soon and brings some smiles to her new home.

It's been tough trying to keep working on my dolls with all the dirt and dust and chaos at home caused by us getting a big load of repairs done, and the resulting decoration. It did delay me with The Lady, but only for a few days, a I had a dread of getting her cream silk tunic dirty.

Where our roof was leaking after a few tiles blew off has now been repaired and the dining room and kitchen have been repainted. Luckily we've managed to get everything back in there where it belongs and all my supplies and tools are back where they should be in my cupboard in there. Believe me, it took an age to get everything back in there and I'm still not sure how I managed it.

Our living room ceiling no longer has a hole in it from when Hubby and his dad left all the doors open on a windy day, and is now a perfect expanse of white smoothness. Cris had a hard day yesterday with my lovely Dad-in-law getting everything prepared for the plasterer that's starting here tomorrow who's going to cover over all of the hideous artex on our living room walls (Why? Just why was this done in the first place?). Then we can get the whole room re-painted and everything moved back in. It's hard not having our pictures up on the walls, and all of our books are packed up in the spare bedroom. They've chased all the wires into the walls, bricked up the old fireplace (can't afford to put a nice one in yet), sunk in all the power points, removed the mantle and curtain rail, and generally covered the whole house with nasty black plaster dust. I can't wait to have everything back to normal. I hate having to wear shoes indoors, but right now I just have to put up with it.


I thought you might be interested in a little How To this week. I've started my next doll, and she's wearing a hoop crinoline along with other period style underwear. I figured out how to make these myself and don't follow a pattern of guidelines, so thought you might be interested as it's not as difficult as you'd think. So here is my How To Make a Hoop Crinoline :)

Step 1 - You'll need to find a strong flat metal banding or wire to make your hoops. Something that's flexible and springy but that won't bend so easily that it will get kinks and bends in it. The metal should be just flexible enough to pull into a hoop, but not so flexible that you can bend it to an angle by hand. The metal banding I use is about 4mm wide and around 1mm thick. It's hard to cut and I normally have to ask for some help to get through it, but this size works well for my largest dolls. How many rings you'll need depends on how many you want to add and how heavy the fabric you'll be using for the dolls gown will be. Generally, I've found 4-6 rings is enough to hold out the layers of skirts and petticoats that will go on top. This one has 4 rings as it's not a very big crinoline. The huge Scarlett O'Hara style skirts need a little more support. And the finished skirts will have another few inches thickness (or more), depending how far you want to go adding ruffles to the following petticoats. So make sure you take that into consideration when deciding on the size of your largest ring. Crinolines were made for support, but were not the only support used. You wouldn't ever see the rings through the final skirts as there would be at least 3 ruffled and very gathered petticoats on top of it between the crinoline and gown, the first of which would normally be a thick calico or rougher cotton to make sure the expensive silk petticoats and the crinoline itself would be protected.

Step 2 - Each hoop needs to be a few inches smaller than the one before. The largest sits just above ankle height, and the smallest at just below mid thigh (although you can fiddle this to get the clothing shape you want), so they need to be sized to create a graded shaped bell or dome. I can't really describe exact sizes as it all depends on how big you want your crinoline to be. This one has a slight gradient to it as I'm making two ruffled petticoats to go on top of it which will add a lot of width to the skirts, but as long as you have an idea of the largest and smallest hoop size you just have to cut the others to fit between them.
Step 3 - Once you tape the ends together with an overlap of about 1inch you can start covering the hoops with ribbon. I use 9mm satin ribbon so that I can make sure that the covering stays tight and fitted. It's also easier to be able to catch the ribbon at the edges when you stitch it together so that the fabric doesn't pull. You can use very narrow strips of fabric to do this, or even wrap the hoops in glue soaked fabric or ribbon if you find it easier. Where the hoop ends join the hoop will obviously be thicker, so I sew one layer over the join with the stitches facing out before covering the rest of the hoop with ribbon with all of the stitches on the inside.

Also, yes, my needle is very bent. I use the same needle until it snaps in two as I prefer a needle that has worn and bent in the middle until it sits nice against my thumb. Every now and then I run the point through my knife sharpener to make sure it stays nice and sharp. It doesn't take me long to get a needle into this shape as I'm not too gentle with them. And it's always a shame when they finally break and I have to start over with a new straight one.


Step 4 - Once all the hoops are covered it's time to measure out and fix the straps that hold the whole thing together. Because of where the hoops need to sit, the lowest at just above ankle and the highest just below mid thigh, with a little help and maybe an extra pair of hands you can work out the overall height of the crinoline hoops and divide the measurement into the number of hoops you have so that you can make sure they are all of an equal distance apart. I've used 6 straps for my crinoline, but again you can use as many as you want.

Step 5 - Leaving about 1cm free at the end of the strap (I'm using a narrower matching ribbon) mark the distances between hoops by inserting a pin or by using tailors chalk or a disappearing fabric marker. I'm old fashioned and always just use pins. You need to make sure you leave enough strap free at the top so that they can be attached to the waistband. Until you can try the crinoline on the doll it's difficult to say what this measurement will be so I always make sure I leave plenty free. After marking regular intervals around the hoops for the number of straps you have you can then start sewing things together. I use a trial and error technique using a ruler to measure gaps until I have them all equal, but any way you get the regular attaching points that works for you will be great.

Step 6 - Starting with the largest hoop sew all of the straps into place at the sewing points using the 1cm left at the ends to wrap around the hoop and create a neat finish. Once all the straps are added to the largest hoop then they all need to be attached to the next largest. Putting it together one hoop at a time can be easier than sewing one strap at a time to all the hoops as it's really easy to get the order mixed up and get things tangled, as nothing will lay where you want it until everything is together. The next hoop and all following hoops get sewn onto the straps with a cross stitch through the strap and around the hoop, catching the fabric that covers to hoop, to make sure things stay where you put them. Continue until all the hoops are attached, making sure that all of your hoop joins stay in line at the back. The final strap that's at the back of the crinoline does not continue up to the waist band so that the doll can be positioned to sit. So cut this strap off leaving about 1cm that you can tuck around the hoop and make a nice finish as you did with the bottom band. If you leave this strap in place then you'll find that the skirts will flip up when you try and seat the doll, just like the ladies in The King & I. Not good for a Victorian lady's sensibilities!

Step 7 - As you can see here, it's a little difficult to make sure all of the straps stay taught when the crinoline is done. But as long as most of them are then everything will work just perfectly. Most of the hard stuff is done now. And the only thing left is to attach it to the waist of the doll. If you want it to be removable so you can remove it to package up or store the doll, or so you can use the crinoline to display a number of different dolls, then you need a waist strap. If not then you can attach it directly to the doll at the under-petticoat waistband. But both methods are roughly the same. Put the crinoline on the doll and pin the straps to the waist, making sure that the bottom of it reaches to where you want it. Do this for all of the straps as best you can. They do all come out different because of the size and space inside the hoops, but it's easy to fix and make sure the whole thing hangs right. Once you have all of the straps pinned, remove the straps while making sure you have the attach points you've found marked with a disappearing marker or with pins. Measure each and find the longest one, then change all of the measurements for all the straps to this.

Step 8 - Once you have all the waist points marked on the straps you can either stitch them directly to the waist, tucking a little bit under to make it neat. Or make loops like I have here so you can thread a ribbon or strap through which can be tied at the back and make the whole thing removable. And that's it. All done easy peasy :) It might seem like a waist of time as most ruffled petticoats would create a very similar look. But you do get the added advantage with a crinoline that you never need to fluff up skirts and they always stay in place. It creates the proper swinging movement and shape to the dolls clothes whether you display them standing or sitting. Below you can see how the hoops collapse together when you seat the doll - Still giving support to the skirts that will be added over the top.


This lady already has her split legged, crotchless drawers, a wide necked off the shoulder shift (quite proud of myself I managed to get the fit right on this as I make them quite rarely), and her long gathered under-petticoat that will protect her legs from the hard hoops and make sure the crinoline stays clean. I've started on the next layer, a stiff calico petticoat with a wide ruffle around the bottom to create extra width, which I'll add over her corset once that is fitted. After this I'll make her a coloured cotton petticoat with a number of smaller ruffles, a fine fabric petticoat trimmed with lace and ribbons, and then get started on her gown.


Sunday, 18 March 2012

The Lady of The Shrine Has Clothes!

I've looked in all my usual places, read many articles, and done a lot of research, but can't find the name of the model used by John Waterhouse for The Shrine. I don't like to keep calling my doll The Lady, and really wanted to find her proper name but it's defeated me. I've read up on lots of Pre-Raphaelite models, from Alice Arter to Beatrice Hackman to Edith Richardson, all used by Waterhouse as models. But no mention of which lady is featured in The Shrine, and I don't like to guess at which one it could be, so I'll continue to call her The Lady. It seems she wants to keep her identity to herself. I added her hair first this time as I knew what colour it had to be, and as her gown is black and white I wanted to make sure she had some colour to stop her looking monochrome. I decided to add a touch of red to the rich brown hair of the lady in the painting, and made up her locks from milk and dark chocolate brown with some mahogany red brown mixed in. She looks very striking with her hair wild around her shoulders, but I'm still considering tying it back at the nape of her neck once she's finished.

The Pre-Raphealite Brotherhood and those involved with them had a very distinctive style. Many of them following the Aesthetic Movement in their style of dress which favoured a more natural body shape and healthier fabrics such as cotton, wool and silk. They were also against the unhealthy practise of tight lacing corsets and many of the women involved shunned them completely. After wrapping up her hair to keep it out of my needles way I made The Lady a pair of standard long crotchless drawers trimmed with lace at the leg. And a more Regency looking shift that is more fitting while still being loose and comfortable, with three quarter length sleeves, a high rounded neckline and a pleated skirt section to allow easy movement. The sleek lines of the gown the lady in the painting wears just didn't seem to fit with the voluminous gathered wide necked shifts worn in this period by Victorian ladies, so I thought the more old fashioned style would be better.

Next came a petticoat, and I couldn't resist using the black and white stripped cotton fabric I found recently at one of my local market stalls. To give The Lady a little more bulk around her middle I made the petticoat quite high waisted, but not so wide that it would cause lumps and bumps, and made sure it would lay nicely under the finished gown. I added a tapestry ribbon trim to the hem that has a sweet Arts and Crafts look to it. I got a bit stuck trying to decide what fabric to use for her black under dress. As you can imagine I've got a few plain black fabrics, and one or two that have a slight pattern in the weave. But none of them looked quite right. Just as I was about to go out and buy some plain black cotton, the one thing I've run out of, I remembered an old velvet scarf that my mother had given me to use for something as she'd managed to catch in on something and had pulled a hole in it.

As soon as I held it up to The Lady I knew it was the right fabric. The depth of colour and rich look was perfect, and it fitted into sleeves and dress perfectly after some adjustments to the shoulders, which came out a bit bulky the first time round. I trimmed the hem with lace to finish it off and then got on to starting her silk over dress or tunic. I love sewing in silk. It has such a soft light feel, but with still a crispness that gives a nice sharp finish to hems and edges. I made an attempt on the tunic style gown yesterday, but somehow ended up with a very nice shift shaped garment that will make lovely underwear for another doll, but just hasn't got the width or drape needed for this outfit. Tonight I'll start it over and make sure I add the extra width that's needed. I've no idea how I ended up with such a nicely tailored shift rather than the draped tunic I wanted, but there you go.

We've just finished off a pretty hectic weekend moving all of our furniture, books and a lot of my supplies out of the dining and living rooms ready for builders to show up tomorrow and fix the patch where we had a leak caused by blown off roof tiles and the hole in out living room ceiling from when Hubby and his Dad cleverly left all the doors open in strong wind and let the doors slam, bringing down a large patch of black plaster. At least the lath stayed up I suppose, and I'm now achy all over from packing and carrying stuff up to our spare room.
I did get the pieces cut ready to make myself some new skirts once The Lady is finished. And Wales won the Rugby and the Grand Slam :) But for now I need to concentrate on getting this lovely doll finished and ready to be sent off to her new home. And then decorating when all the work here is finished. Hope to get some time to read The Scarlet Letter at some point too. Think I'm going to be a busy girl.

Sunday, 11 March 2012

Pretty Dolls, All Bald and Waiting


There wasn't anything new to share with you last week, so I saved posting here until today. A lot has happened in the last two weeks and my house has looked a little bit like a doll factory, with dismembered bits of bodies laid out to dry or waiting to be attached on every free surface. As you can see, my clay finally arrived and I got to work straight away sculpting my dolls bodies and faces.


I always start by covering the dolls bodies first before letting it dry thoroughly so that while I sculpt my faces I have something solid and firm to hold on to. I like to keep their shape very simple as old dolls would have been, and only add shaping to the shoulders and bust. Because of the many layers it usually takes to make the costumes I like to give my dolls I try and add a little extra length to the bodies of the ones I know will have many petticoats and skirts. That way I know they will still look like they have some sort of body when I'm finished with them.

While their hip area is narrow enough to let me drill a hole through them so that their legs can be attached, the shoulders of these two largest sizes of dolls has always given me problems as I just can't find a drill bit that's both long and strong enough.
I've found a way now of drilling through the dowel base of the body and then building up the layers of foil core and then clay while using a long doll sculpting needle through the hole to make sure that I keep a straight usable hole ready to attach their arms when they're done.
It isn't easy to work around the needle, but when I've tried wire the clay always seemed to bend it as it dried. I find problems if I'm not careful to make sure everything is still straight inside before moving on to the faces as things move. It's surprising how much paperclay shrinks as it drys, but it has such a lovely finish to it.

Next come one of my favourite parts of doll making - The Faces. By adding layers of wet clay to the area where I want the face to be, making sure I add the thickness in the right places to give the head the tilt that I want, I get the faces ready to have the eyes set in. I remove the shank from the buttons I've chosen and push them into the wet clay, letting it squish and bulge up around the buttons to create the temples and forehead, working it with my fingers to get everything even and smooth. I push a hole into the moth area and pull it into the expression I want and then let the clay dry a bit on a warm (but not hot) radiator to let it firm up while I work on the next doll.

I try and let the faces dry completely before moving on to the other features, but sometimes it's still only semi-dry before I start on the nose, cheeks and lips. I'm not very patient once I get going. If the clay has shrunk back around the eyes in any area I build it back up again with more clay now too. I like best to take my time with my faces to not get caught making every one look very much like the next. Even if I think them ugly when they are sculpted I try to only tweak a little. Everyone is different and unique, and if that's how a doll wants to look who am I to argue with them. The strangest looking dolls very often turn out to be very beautiful once they have some clothes and their hair added.

Now that they have all been sanded smooth, wet polished, painted and varnished tonight I get to choose arms and legs for each lady and the two gentlemen mixed into the group, stringing them all together with tiny glass seed beads and vintage thread in a special way I've developed for myself which is good and strong. For the first doll I'll be working on further, The Lady of The Shrine for Neiaushie which will be dressed in a silk gown in the style of the beautiful John Waterhouse painting, I first chose a dark sage green / brown pair of buttons from my stash. After setting a larger pair the same in one of the larger dolls they looked very black, so instead I searched out the lovely pearly swirly brown and copper coloured buttons that you can see in the face above (bottom left corner). The different colours that show in these eyes when you turn her in the light made me think they'd be perfect for an artists muse. What artist could resist trying to capture their beauty :)

Sunday, 26 February 2012

Arms & Legs, Paint & Varnish

It's been a while, but I've been a busy girl!

After finishing Hyacinth Plum and sending her on her way, I wanted to get started sculpting some new dolls so that I could make my next custom order, The Lady in John Waterhouse's beautiful painting The Shrine, from scratch to make sure I could get the details exactly how I see them in my mind.

I was running low on my largest and large size dolls as I've made all the ones I last sculpted apart from one (I'm waiting to find the perfect flat wire to make another crinoline), and I like to sculpt in batches as I always seem to have a long list of dolls that I want to make, and know who they will be. Sculpting one doll or 10 doesn't seem to take any longer because of the drying times needed on the layers of paperclay. So, after checking my doll making To Do list, I decided to make 9 of each size.

I spent a lovely evening doing one of my favourite things - Shopping for all the supplies I'd need to make these 18 dolls, add their hair and string them together. I also found the loveliest pale cream soft silk for my Lady of The Shrine's gown at one of my favourite fabric stores online - The Silk Route. I highly recommend them if you need silk for any of your projects as they have a great selection of textures and colours, and do lots of different sizes so you can buy just the amount you need.

As I had to wait for the wooden balls I needed to make the body armatures for my dolls, and the dowels to make their arms and legs, I started as I usually do and started making up a plan of work so that I could keep on top of what needs to be done each day. I've got a habit of forgetting to varnish things that I need to be ready next day. So have learnt that I need a list to keep me going when I'm making a large amount of dolls.


The dowels arrived very quickly so I knew my first task would be to cut all the pieces I'd need to make up the 18 pairs of arms and legs. I have to admit that making limbs is one of the most boring bits of doll making for me. It takes quite a while to cut each piece to the right length, sand and shape them, drill the holes that are needed for stringing the doll together, adding layers and layers of paint and three coats of varnish to each piece.

I have made lovely anatomical hands and feet in the past for my dolls. But they don't seem to fit with my style of dolls.
I like them to have the feel of old, antique, handmade dolls, which is why I make every layer of their costumes as well. And the simple down curved pointed toe feet and mitten style hands seem to fit much nicer.

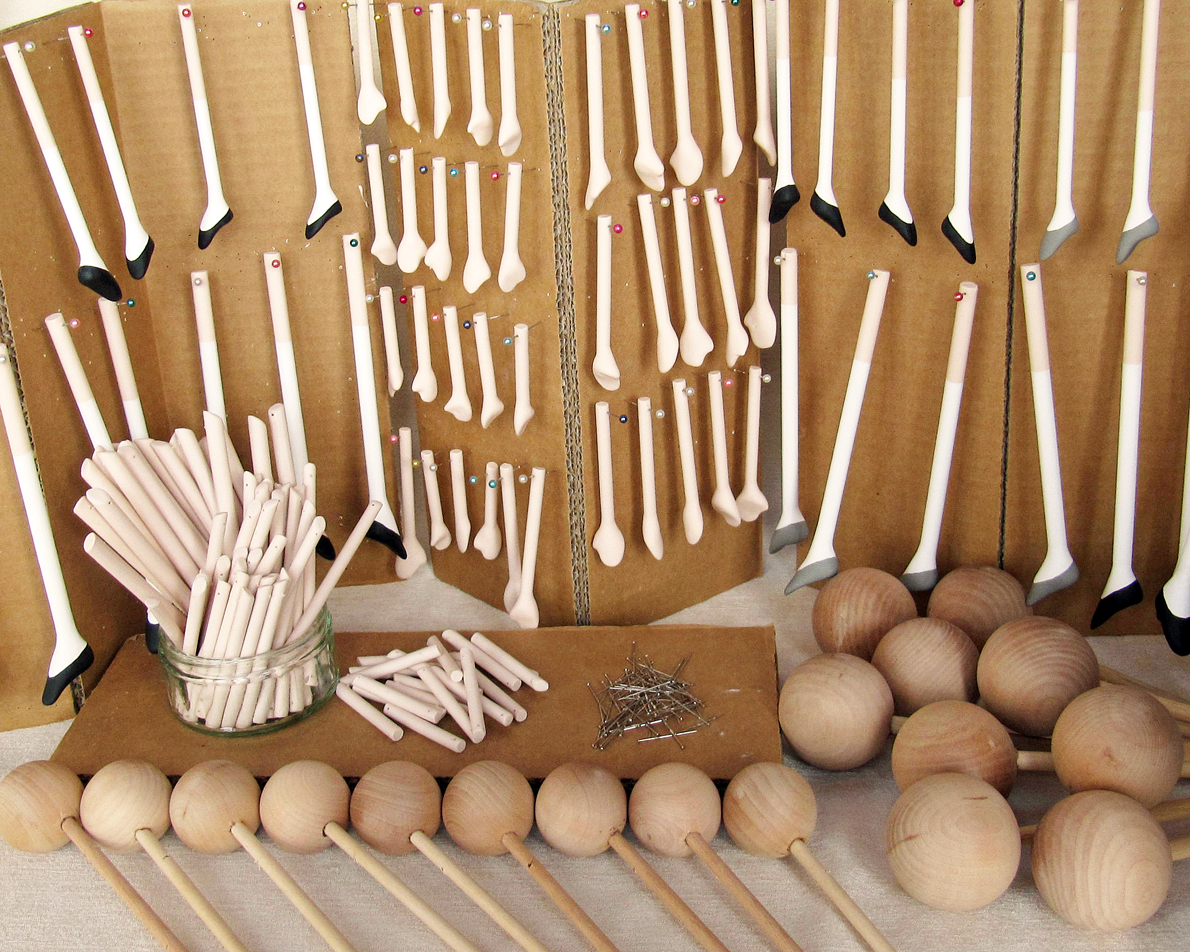
I worked on getting every hand and foot sculpted to the ends of the leg and arm dowels. Setting them to dry on accordion folded corrugated cardboard drying boards that I stand on top of my living room radiator so that they cure slowly and evenly.

I hang each piece on the boards with large headed pins so that they touch nothing as they dry. I also find that this makes them easier to handle while I paint them as I can hold onto the pin instead of the wet paint.

Every hand always ends up different, each having it's own unique shape that adds character to the dolls. When they are finally strung together I always find there are dolls that just demand to have something to hold, or others that look like they are wringing thier hands together or waving at me shyly just because of a certain angle or tilt of a hand.


Every leg gets many thin layers of paint over a base coat to build up the leg colour, white stocking and lastly the shoes. Later, when the dolls I'm dressing tell me what they want I sometimes add stripes to thier stockings or a pretty spangle or bow to their shoes, or even repaint their stockings in a different colour. But for now I leave them all plain white.
I've spent a week of evenings after work, my hands covered in a sticky mix of paint and varnish getting each piece of arm and leg finished. And they're finally all done, and as you can see in the photo below all strung together at the knee and elbow joints with one of my favorite reels of strong vintage thread.

All they need now is some bodies to attache them too. Which is where I found a problem.

I was sure. I was positive that I had a large packet of paperclay in the dresser where I keep all of my supplies. I looked and searched and pulled things out all over the floor. I even had hubby digging around trying to find it as well, but no joy. I was a doll maker without the clay I needed to get on to one of my favourite parts of the whole process. Sculpting the faces.

As you can see my arms and legs hang in matched pairs waiting to be attached to bodies that I can't sculpt yet, making me sad. And my bodies all lay there with the armatures built up with foil covered in masking tape waiting to be covered and shaped with layers of paperclay, the tilt of thier blank heads already accusing me of not being organised enough.
It's been over a week since I ordered three new large blocks of clay, and I'm still waiting for it. All Saturday morning I sat listening for the postman to approach my door with my parcel, but by 1pm I had to give it up as lost. I'll be very disappointed if I can't work on the faces this week and get them done by next weekend. My fingers are itching to push and pull and shape that lovely soft smooth clay into the shapes that I want, and add the first little injection of life into my dolls. It's only then that I see who will be sad, and who will be cheeky, who will be shy and who will be demanding.
Soon. Please arrive soon!

Sunday, 5 February 2012

A New Rag Doll Called Hyacinth

Last weekend I had a lovely e-mail from a lady called Neiau Shie asking me to make her a special rag doll called Hyacinth. So how could I say no. I started straight away.

It'd been a while since I made a rag doll, and it's been really nice to work in all cloth and not have to wait while clay and paint dry for a change, although I know I'll always return to paperclay in the end. It's always fun to do things that I'm not used too.

I know she looks like some sort of strange alien now, but I promise she starts to look more normal in the photos below once she has hair. The pattern I use for my rag dolls is one I've worked out and refined myself over a few years. And I've pretty much got it the way I want it to be now. Made from two flat pattern pieces of strong calico with inserts added to the bottom of her feet to fatten them up, I sometimes make the legs separately like I have for Hyacinth to give them a better floppy feel.

I like my rag dolls to be stuffed quite firmly, and I reinforce their necks with a piece of small dowel so that the weight of their hair doesn't drag the neck back and make them stare at the sky.

Hyacinth has two black vintage button eyes attached to her flat head with a precious piece of the strong vintage linen thread that my Nanna gave me. And her hands have been sewn through to create her fingers. Her socks, shoes, facial features and tinting around her eyes are painted on with thinned acrylic, and I've stained the whole doll with a concocted mix of stuff to give her a more aged mottled look.

It doesn't really show properly here as the winter weather in Wales doesn't really provide the right light to take photos very often. But Hyacinth has a soft blush on her cheeks, and I've painted her lips in a deep purple red colour to match her dark outfit.

Hyacinth is to be a Regency Gothic lady with an empire line gown and pelisse or coat. Neiau Shie has asked me to make her in the image of the wonderful characters written by some of my favourite authors, Austen and Bronte etc., and showing the darker side of the lives these writings portrayed.

Women of the Regency era led very restrictive lives where the appearance of a calm serene gentle countenance was much more important than the true feelings they were made to hide away.
The wonderful Miss Elinor Dashwood of Jane Austen's Sense and Sensibility is a perfect example of how her proper behaviour ensured her torment over the man she loved. She had to watch him be claimed by another while being helpless to do anything about it. Her behaviour was considered proper and correct, even though she was considered cold and passionless by her careless younger sister. Elinor had to carry her pain hidden to herself, watching silently as her love seemed to slip further and further away from her.

There are so many written characters that have this darker tormented side to them, often in the midst of a much lighter tale. Not all of them as obviously troubled as Cathy in Wuthering Heights or Mr Dickens' Miss Havisham. But all of them showing us now how life was for women during the times they were written.

Making Hyacinth to fit with this image is making me think of wind-swept mores and rocky hillsides, driving rain and feelings poured into journals so the writer can manage to hold them in and carry on without showing them.

I gave Hyacinth very long dark brown wool hair by sewing on doubled lengths of wool in rows along the back of the dolls head. I always make sure that I add a lot of hair to give them a full thick look, and to give the dolls head a rounder better shape. I've tried making their heads round and not flat, but couldn't get the hair the way I wanted it then, so went back to the flat pattern again. I'm not too sure how I'll style it yet, if at all, but she's starting to have a very distinctive character of her own.

So far I've made Hyacinth her nightgown, but haven't trimmed it yet. And tonight I'll be adding a lace collar and ribbon trim to finish it off. Maybe a few buttons at the front too, before I go on to make her overcoat.

The reasons behind why Hyacinth will be wearing her nightie under her coat is something that I'm not too sure if her new owner would want me to share as it's quite personal to her. But I'm very touched that she felt that she could share her reasons with me. It's really helped me to make sure that Hyacinth will be truly unique, and as special as I can possibly make her.

I can't wait to see Hyacinth all finished and ready for her quite walk through the dark night contemplating her own thoughts. I'm really enjoying making a doll from ideas that have been given to me to play with in my own way. I'm not too sure yet how I'll finish her off. At the moment I'm thinking of giving her a shawl to keep the night chill away, but we'll see what she decides when the time comes.