
And it still goes on... The decorating I mean.
We still have the odd little bits and pieces to finish, but we're now almost there. But unfortunately it's meant that not a lot of doll making has happened, and this poor lady is still in her undies.
I wanted to share something with you all, but all I've managed to do is finish her ruffled petticoat. So as it's one of my most hated hand sewing tasks (even though I love the results) I thought I'd share with you my technique.
Of course as I'm a doll maker, this is a doll sized petticoat. But the method would be very much the same to make a full sized one - It would just take a lot longer and involve a load more fabric.
 Step 1 - First you need to find the measurement of your base for the ruffled petticoat. The easiest way I've found to do this is to make sure all the under-petticoats, crinoline and calico petticoat are laying as they should be, fluff them up a bit, and then gently lower the doll down onto a flat surface - trying to make sure that the diameter of the skirts stays basically the same. Once this is done I use either a dressmakers tape measure or a piece of ribbon to measure around the circumference. Each petticoat added to this style of clothing should be at least a few Cm's bigger than the last, so once you find your base measurement add on a couple of centimetres just for good measure. I normally add 4-5cm's.
 Step 2 - Your ruffles need to be double the width of the base. I know the base is already looking too big to ever fit around your doll (or you), but trust me this does work.
You can add as many ruffles as you like, and bring them up as high as you like. But I'd suggest leaving at least the waist to mid thigh area free of ruffles as the waist gathers add a lot of bulk on their own. Decide how many ruffles you want to add, and cut enough strips (piece together to gain the right width) that are double the width of the base.
 Step 3 - Now the horrible bit, for me anyway. The base, and each ruffle have to be hemmed. To add to the stiffness that you want a double rolled hem is best. You don't need to make things more complicated with fancy stitches unless you want to. I normally use cotton or cotton lawn fabric to make this kind of petticoat so a straight forward running stitch works just fine. Once all your ruffles are hemmed the width needs to be measured and turned over at the other edge to give you a gathering edge. It's best not to do it in one piece unless your brave. But I get terrible trouble with tangled threads when they're long as my needle always seems to turn somehow as I go along, so I tend to gather a quarter of the width at once. Knot on at the start of your quarter, and leave a longish tail of thread free at the end. Knot on close to this and do the next quarter.
 Step 4 - Prepare the base of the petticoat by measuring out lines on your fabric with tailors chalk or a disappearing fabric marker. The first bottom ruffle mark needs to be 2mm shorter than the ruffles. My ruffles are 5cm each, so my first line is measured up 4.8cm. Because the gathers stick out once your finished they need this tiny bit of extra length so that they look the same length as your base. Each following line should be 1cm shorter than the width of each ruffle so that they overlap (my lines are 4cm apart). Or if you want loads of extra bulk then sew them closer together. Draw on all the lines now while you have a nice flat piece of fabric. Otherwise you might find that the ruffles you have sewn get in the way when trying to draw on the next line.
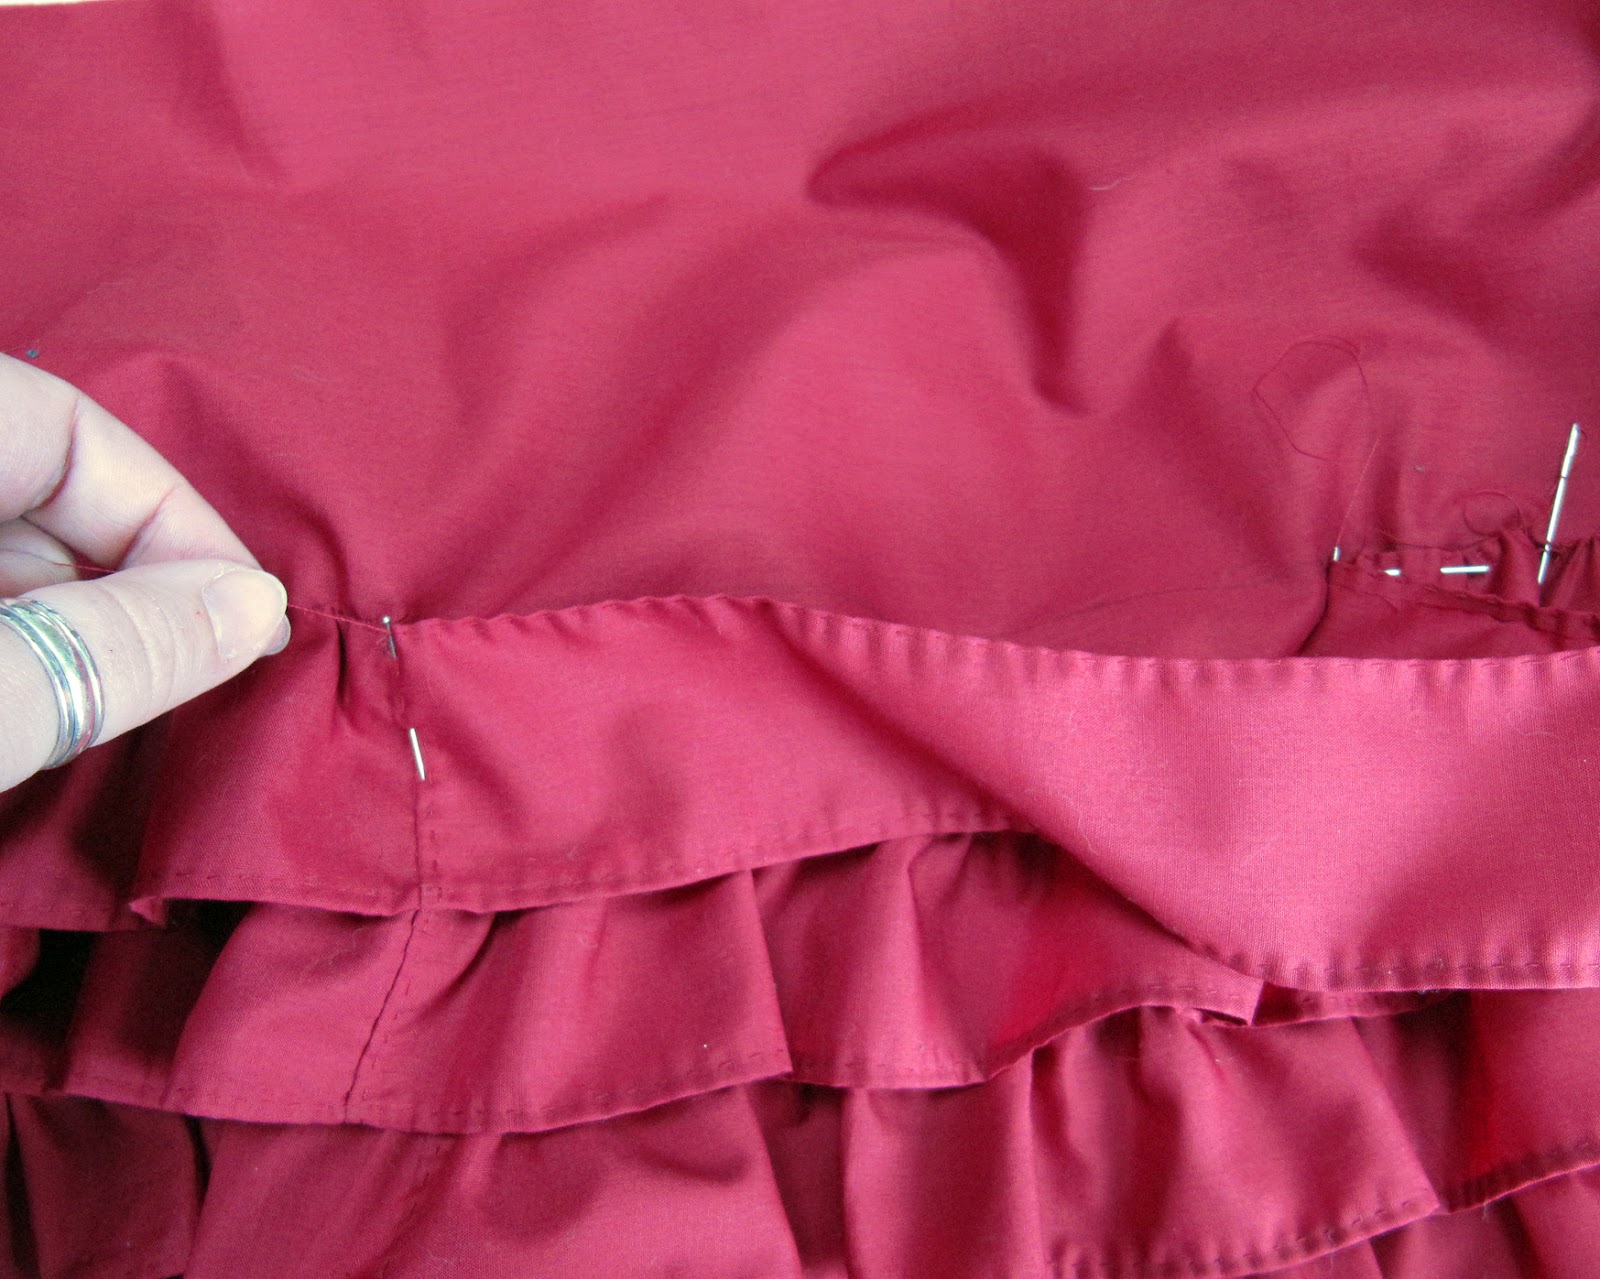 Step 5 - On both the ruffles and the base mark the fabric into 8 equal parts by adding a pin. Divide into quarters, and then divide each quarter into half rather than try and do it all at once. That way you can do it by folding the fabric and won't have to bother getting the tape measure out. If your a sewing neat freak like me you can line up all your hems, but there isn't really much need to unless you want to. Pin the ruffles to the base along your first line by matching up the 8th's that you've pinned and pining them together, Now your ruffle will hang in a load of long loops like this around your base.
 Step 6 - If you try and pull up all the slack in your ruffle by taking hold of the loose end of thread and pulling everything can quickly go very wrong - I know this from experience. To get a good result here a clean doormat, a large firm cushion, or even the living room carpet can be a great tool. Starting at a knot in the gather thread of your ruffle, lay the fabric over your mat, rug, carpet or cushion and pin through the ruffle and base into it making sure that your pin is leaning back away from the direction you'll be pulling the thread in. This is a task I normally do on the floor on my living room rug as it gives me the most amount of space, but they all work just fine and I've tried them all at different times.
  Step 7 -
  Gathered Ruffle pinned into place.
 Step 8 - When you do get to the loose end of the thread, and have used this to gather the previous section, use the remaining thread to knot the ruffle fabric to the base and stop your gathered section from coming undone by a couple of over-stitches. Don't cut of the tail of thread as this will be used. Just leave it were it is and carry on gathering sections until you get back to your starting point.
 Step 9 - When you get back to where you started with gathering the ruffle, and have knotted off the loose thread, you can start sewing the ruffles to the base. Use the loose thread ends where you've over-stitched the ruffle to the base and use as small a quilting stitch (or over-stitch) as you can to sew the two together. The ruffle will have gathered into folds and bumps, so just flatten into a crease with your fingers and sew through to get the edge to lie flat against the line where your joining them.
 Step 10 - There isn't much else to it really. Once you finish one ruffle you move onto the next and repeat the gathering and attaching until you have your finished ruffled petticoat. All that's left is to try it against your doll (or yourself) to find the length and cartridge pleat it to a waistband. Just make sure you allow enough length to account for the waist gathers. I sew my petticoats directly to the doll at a waistband I add before I start. If this is a full sized petticoat that you want to take off (of course) then you can measure, fold and sew a waistband with a closure. When you cartridge pleat the fabric of the petticoat to it just make sure you leave an opening along the seam where the closure is added to make sure you can get it off and on. To attach it to a doll I only sew on the top pleats of the cartridge pleat using a doubled thread, but if your making it full sized then I'd recommend sewing the bottom of the pleats as well.
And here she is in all her ruffles.
As you can see now the pleating at the waist adds a lot of bulk of it's own, so you really don't have to take the ruffles all the way up, unless you want to, if your using a crinoline. For earlier periods then the more bulk the better as there were no crinolines. Before the invention of the cage crinoline women wore corded petticoats, ruffles and any other techniques they knew, along with lots and lots of layers to get the skirt shape they wanted. The sheer weight of fabric must have been incredible. They must have had thighs like a rugby player!
Even after crinolines came on the scene there were still many many layers of skirts. Because of the restrictions I have getting all this fabric to fit around the tiny waists I like to give my dolls I usually stick to the under-petticoat, crinoline or corded petticoat, one or two ruffled petticoats, an over-petticoat and then the gown itself. You can cartridge pleat two or even three layers of petticoats to a waistband together, but you do loose out on the full width that way as each layer has to be the same width, and it creates more of a bell shape. But if that's what your after then you'll save yourself some work.
This doll has her white cotton under-petticoat, a pink satin covered crinoline, a stiff calico petticoat with a deep ruffle at the hem, and now her red ruffled petticoat. Next she'll have a fine over-petticoat trimmed with ribbon and other details before I get to started on her gown. I love the size of her skirts and the way they swing. She has a lovely weight to her already and is truly a joy to hold. I can't wait to get her finished :)
No comments:
Post a Comment